
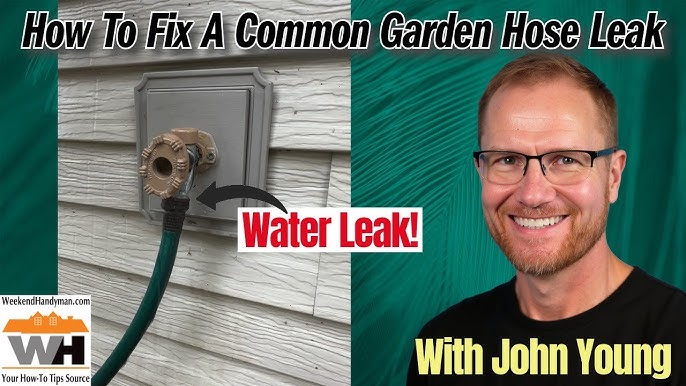


Is your garden hose leaking or the end cracked? Replacing a garden hose end might sound tricky, but it’s easier than you think.
With the right steps, you can fix it quickly and save money. Imagine never worrying about water spraying everywhere or losing water pressure again. In this guide, you’ll learn exactly how to replace your garden hose end fast and hassle-free.
Keep reading—you’ll be surprised at how simple it is to get your hose working like new!
Tools And Materials Needed
Replacing a garden hose end is a simple task you can do yourself. You only need a few tools and materials to get started.
Knowing what tools and materials to use will help you finish the job quickly and safely.
Essential Tools
You need some basic tools to replace a garden hose end. These tools help you remove the old end and attach the new one.
- Adjustable wrench
- Pliers
- Utility knife or scissors
- Teflon tape (optional)
- Replacement hose end
Choosing The Right Hose End
Select a hose end that fits your hose size. Hose ends come in different sizes and styles for different hoses.
Check the hose diameter and thread type before buying a replacement hose end.
- Measure hose diameter (usually 5/8 inch or 3/4 inch)
- Choose a brass or plastic hose end
- Match the thread type (male or female)
- Pick a style that suits your needs (quick connect or standard)
Safety Precautions
Always take safety steps when working with tools and water hoses. This helps avoid accidents and injuries.
Turn off the water supply before removing or attaching the hose end. Wear gloves to protect your hands.
- Turn off water supply
- Drain water from the hose
- Wear gloves to protect your hands
- Use tools carefully to avoid damage
- Work in a dry area to prevent slips

Credit: www.reddit.com
Preparing The Hose
Before replacing a garden hose end, you need to prepare the hose properly. This helps make the repair easier and cleaner.
Preparing the hose involves turning off the water, draining leftover water, and cutting off the damaged part.
Turning Off Water Supply
First, turn off the water supply to the garden hose. This stops water flow and prevents leaks while you work.
Locate the outdoor faucet and turn the handle clockwise until it is fully closed.
Draining Remaining Water
After turning off the water, drain any water left inside the hose. This makes it easier to cut and attach a new end.
Lift the hose and let the water flow out completely. You can also shake the hose to remove trapped water.
Cutting The Damaged End
Use a sharp utility knife or garden scissors to cut off the damaged end of the hose. Make a straight, clean cut.
Cut about one inch from the damaged area to ensure a good connection for the new hose end.
Attaching The New Hose End
Replacing a garden hose end is simple with the right tools. Attaching the new hose end ensures a tight, leak-free fit.
This guide shows how to select the connector, insert the hose, and secure it properly.
Selecting The Correct Connector
Choose a connector that matches your hose size and type. Most garden hoses use 5/8-inch connectors.
Pick connectors made from durable materials like brass or plastic. Brass lasts longer and resists rust.
- Check the hose diameter before buying
- Match the connector thread type (usually male or female)
- Use brass for durability, plastic for lightweight needs
Inserting The Hose Into The End
Cut the hose end straight and clean. A sharp knife or hose cutter works best.
Push the hose firmly into the connector. It should fit snugly without gaps.
- Make a straight cut to avoid leaks
- Insert the hose until it reaches the connector’s stop point
- If needed, soften the hose end by soaking it in warm water
Securing With Clamps Or Fittings
Use hose clamps or built-in fittings to hold the hose end tight. This prevents leaks and disconnection.
Tighten clamps firmly but do not over-tighten. Over-tightening can damage the hose or connector.
- Place the clamp over the hose near the connector
- Tighten with a screwdriver or wrench
- Check for leaks by running water through the hose
Testing The Repair
After replacing the garden hose end, you need to test your work. This helps make sure the hose works well. Testing shows if the connection is tight and no water leaks out.
Follow these simple steps to check your repair. This keeps your garden hose ready for use and prevents water waste.
Turning The Water Back On
Slowly turn the water faucet back on. Open it just a little at first. This lets water flow gently into the hose. Watch the hose end carefully as water moves through.
Turning water on slowly helps avoid a sudden burst of pressure. It protects your new hose end from damage right after repair.
Checking For Leaks
Look closely at the new hose end for any water drops or spray. Leaks can appear around the connection or on the fitting. Keep your hand dry to feel any water escaping.
- Check the hose end where it attaches to the hose
- Look for small drips or wet spots
- Feel around the connection for moisture
If you see leaks, do not turn the water fully on yet. Fixing leaks early saves water and stops damage.
Adjusting The Connection
Tighten the hose end by hand if you find leaks. Turn the fitting clockwise to make it tighter. Avoid using tools that can over-tighten and damage the hose.
- Hand tighten the connection firmly
- Check for leaks again after tightening
- Repeat tightening if needed, but do not force it
Once no leaks appear, open the water faucet fully. Your garden hose is now ready for use with the new end securely in place.
Tips For Hose Maintenance
Keeping your garden hose in good shape helps it last longer. Simple care steps prevent leaks and cracks.
Replacing a hose end is easy if you maintain the hose well. Follow these tips to keep it working.
Proper Storage
Store your hose in a cool, dry place away from sunlight. Heat and sun can weaken the material.
Use a hose reel or hanger to keep it off the ground. This prevents kinks and tangles.
- Coil the hose loosely without sharp bends
- Avoid leaving it under direct sun for hours
- Drain water before storing to stop freezing damage
Regular Inspections
Check your hose often for cracks, leaks, and loose fittings. Early fixes save money and effort.
Look at the hose ends carefully. Replace worn or damaged ends to stop leaks.
- Feel along the hose for soft spots or cracks
- Test water flow to find hidden leaks
- Tighten or replace hose connectors as needed
Avoiding Common Damage
Do not drag your hose over rough surfaces. This causes wear and holes.
Avoid sharp bends and kinks when using the hose. They weaken the hose walls.
- Lift the hose instead of pulling it on rough ground
- Keep hose away from chemicals and oils
- Do not leave water pressure on when not in use

Credit: www.familyhandyman.com

Credit: www.reddit.com
Frequently Asked Questions
How Do I Remove A Damaged Garden Hose End?
To remove a damaged hose end, first turn off the water supply. Use pliers to twist and pull off the old fitting gently. If stuck, apply lubricant and wait a few minutes before trying again.
What Tools Are Needed To Replace A Garden Hose End?
You’ll need pliers, a utility knife, and a replacement hose end fitting. Optionally, use Teflon tape for a tighter seal. These tools help you safely cut, remove, and attach the new hose end.
How Do I Attach A New Hose End Securely?
Insert the hose into the new fitting firmly. Tighten the clamp or screw to hold it in place. Ensure no gaps or leaks by testing with water pressure after installation.
Can I Replace A Garden Hose End Without Cutting The Hose?
Usually, you need to cut the hose for a proper fit. However, some fittings slide over the hose and clamp tightly. Check the fitting type before deciding if cutting is necessary.
Conclusion
Replacing a garden hose end is simple and rewarding. Follow these steps to ensure a leak-free connection. First, gather your tools and materials. Next, cut the damaged part of the hose. Attach the new fitting tightly. Test the hose for leaks before using it.
With these steps, your garden hose will work like new. Remember to check regularly for wear and tear. A well-maintained hose saves water and effort. Happy gardening! Enjoy the satisfaction of a job well done. Your plants will thank you.