
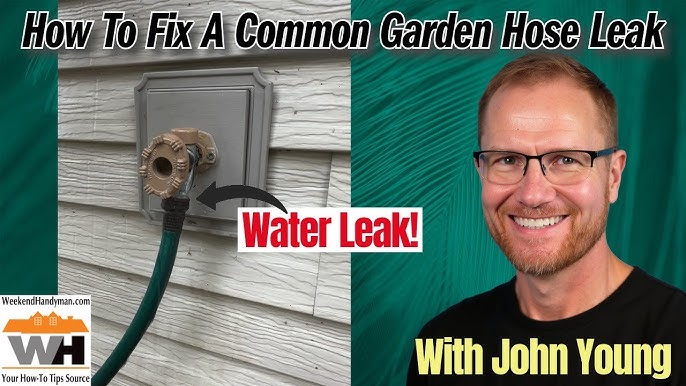


Is your garden spigot leaking or not working like it used to? A small drip or a faulty handle can waste water and cause frustration every time you try to water your plants.
You don’t need to call a plumber or buy a brand-new spigot. With the right Garden Spigot Repair Kit, you can fix the problem quickly and easily yourself. You’ll discover how to choose the best repair kit and step-by-step tips to get your spigot running smoothly again.
Keep reading—you’ll save time, money, and avoid unnecessary hassle!

Credit: www.amazon.ca
Common Causes Of Leaky Garden Spigots
Garden spigots can start leaking for several reasons. Fixing leaks early saves water and prevents damage.
Understanding the main causes helps you repair your spigot quickly. Some parts wear out or get loose over time.
Worn Out Washers
Washers stop water from flowing when the spigot is off. They press against the valve seat to seal the water.
Over time, washers wear out and crack. This causes water to leak even when the spigot is closed.
Damaged O-rings
O-rings are small rubber rings that fit inside the spigot. They help seal the handle and stem areas.
If O-rings break or dry out, water can drip from the handle or base of the spigot.
Loose Packing Nuts
Packing nuts hold the stem in place and keep the spigot sealed. If they loosen, water may leak around the stem.
Tightening the packing nut can often stop small leaks without replacing parts.
Corroded Valve Seats
The valve seat connects to the washer to block water flow. Corrosion can cause rough surfaces and gaps.
Corroded valve seats prevent a tight seal. This makes the spigot drip or leak constantly.

Credit: www.homehardware.ca
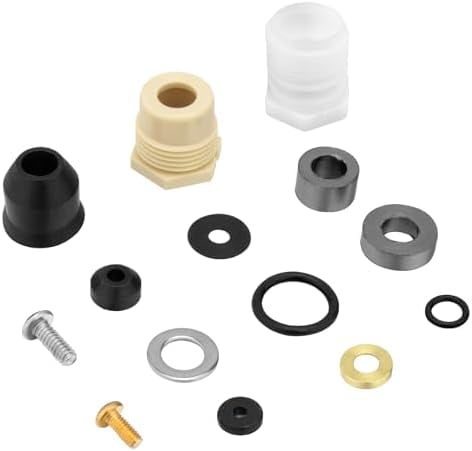
Essential Tools For Repair
Repairing a garden spigot requires some essential tools. These tools help you fix leaks and other common problems.
Using the right tools makes the repair process easier and more effective. Let’s explore the tools you need.
Wrenches And Pliers
Wrenches and pliers are important for loosening and tightening parts. They help you remove the spigot from the pipe.
Adjustable wrenches fit different sizes of nuts and bolts. Pliers provide extra grip when you need it.
Replacement Washers And O-rings
Washers and O-rings stop leaks in your spigot. Old ones can wear out and need replacing.
Keep a set of replacement washers and O-rings handy. They are affordable and easy to replace.
Teflon Tape
Teflon tape seals the threads of the spigot. It prevents water from leaking through the threads.
Wrap the tape around the threads before attaching the spigot. This ensures a tight, leak-proof connection.
Screwdrivers
Screwdrivers are needed to remove screws from the spigot. They help you access internal parts for repair.
Both flathead and Phillips screwdrivers may be needed. Check the type of screws on your spigot before starting.
Step-by-step Repair Process
Fixing a garden spigot needs careful steps. Follow these instructions to repair it safely.
This guide covers turning off water, removing parts, and replacing washers and seals.
Shut Off Water Supply
Locate the main water valve for your garden. Turn it clockwise to close. This stops water flow to the spigot.
Remove The Handle
Use a screwdriver to remove the screw holding the handle. Pull the handle off gently to avoid damage.
Inspect And Replace Washers
Check the washer for cracks or wear. If damaged, replace it with a new one of the same size.
- Remove the packing nut with a wrench.
- Pull out the valve stem carefully.
- Take off the old washer from the stem.
- Attach the new washer securely.
Replace O-rings And Seals
Worn O-rings cause leaks. Remove old O-rings and seals and replace them with new ones matching the size.
| Part | Signs of Damage | Replacement Tip |
| O-Rings | Cracks or brittleness | Use silicone grease for smooth fit |
| Seals | Flattened or torn | Choose exact size for spigot model |
Reassemble And Test
Put the valve stem back in place. Tighten the packing nut and reattach the handle.
Turn on the water supply slowly. Check for leaks and proper water flow from the spigot.
Tips For Preventing Future Leaks
Leaks in garden spigots can waste water and cause damage. Fixing leaks is easier with good care.
Use these tips to keep your spigot working well and stop leaks from coming back.
Regular Maintenance
Check your garden spigot often for signs of wear or leaks. Tighten loose parts and clean dirt away.
Replace washers and seals before they break. This keeps water from dripping and saves money.
- Look for cracks and rust on the spigot
- Turn off the water supply when not in use
- Lubricate moving parts to prevent stiffness
- Test the spigot after repairs to ensure no leaks
Proper Winterization
Cold weather can freeze water inside your spigot. Frozen water can cause cracks and leaks.
Drain the spigot and turn off the water supply before winter. Use insulated covers to protect it.
- Disconnect hoses and drain water completely
- Use foam covers to keep the spigot warm
- Check for leaks in early spring after winter
Using Quality Repair Kits
Choose repair kits with durable parts. Cheap parts may wear out fast and cause leaks again.
Follow instructions carefully when fixing your spigot. Proper installation helps the repair last longer.
- Buy kits with strong washers and gaskets
- Use tools that fit your spigot parts well
- Replace all worn parts, not just one
When To Replace The Entire Spigot
Garden spigots are important for watering and outdoor tasks. Sometimes, repair kits can fix small problems. Other times, replacing the whole spigot is better. Knowing when to replace it saves water and money.
Look for signs that a repair will not last long. This guide explains when to replace your garden spigot for good results.
Severe Corrosion
Corrosion can damage the spigot’s metal parts. If rust covers most areas, the spigot may weaken and leak. Cleaning or patching rust works only for small spots.
- Check for deep rust or holes.
- Look at the spigot base and handle.
- Severe corrosion means replacement is needed.
Multiple Leak Points
If water leaks from several places on the spigot, repairs may not fix all issues. Multiple leaks waste water and cause damage.
| Leak Location | Repair Difficulty | Replacement Advice |
| Spout | Low | Repair may work |
| Handle area | Medium | Consider replacement |
| Base or pipe connection | High | Replace spigot |
Cost Of Repairs Vs Replacement
Sometimes, repair parts cost almost as much as a new spigot. Also, repairs take time and may fail again soon. Replacing the spigot can be cheaper in the long run.
- Compare the price of repair parts and a new spigot.
- Think about labor or time spent on repairs.
- Choose replacement if repair costs are close to new spigot price.
Credit: www.walmart.com
Frequently Asked Questions
What Is Included In A Garden Spigot Repair Kit?
A garden spigot repair kit typically includes washers, O-rings, screws, and a replacement handle. These parts fix leaks and restore spigot function efficiently.
How Do I Fix A Leaking Garden Spigot?
To fix leaks, turn off water supply, replace worn washers or O-rings, and tighten all connections. Use a repair kit for best results.
Can I Install A Garden Spigot Repair Kit Myself?
Yes, most kits come with instructions and are easy to install. Basic tools and minimal plumbing knowledge are usually enough to complete repairs.
How Often Should I Repair My Garden Spigot?
Repair your spigot when you notice leaks, reduced water flow, or handle issues. Regular maintenance every 1-2 years can prevent major problems.
Conclusion
A garden spigot repair kit saves time and money. It fixes leaks and stops water waste fast. Using the kit is simple and clear. You can keep your garden healthy with steady water flow. No need to call a plumber for small repairs.
A working spigot makes outdoor chores easier. Choose a kit with all needed parts. Repairing your spigot helps your home stay efficient. Keep your garden tools ready for any fix. Small repairs protect your garden and save resources.